Udders
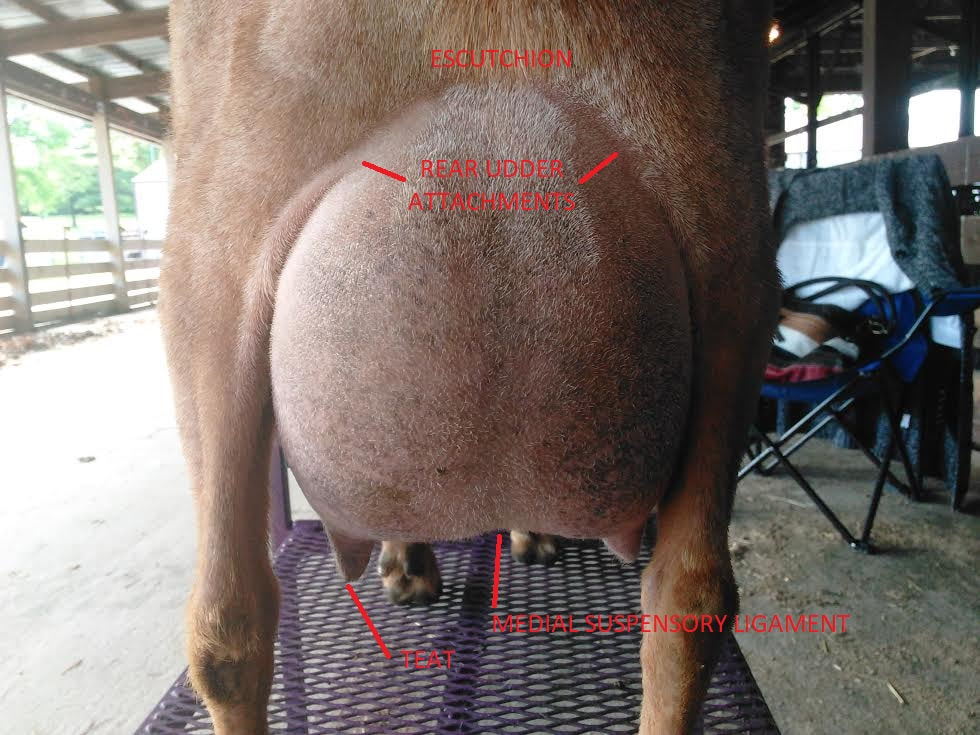
The udder is an amazing structure. If you are at all interested in milking your goats, you should first understand some basic anatomical terms concerning the udder of the milking goat.
The udder is an amazing structure. If you are at all interested in milking your goats, you should first understand some basic anatomical terms concerning the udder of the milking goat.
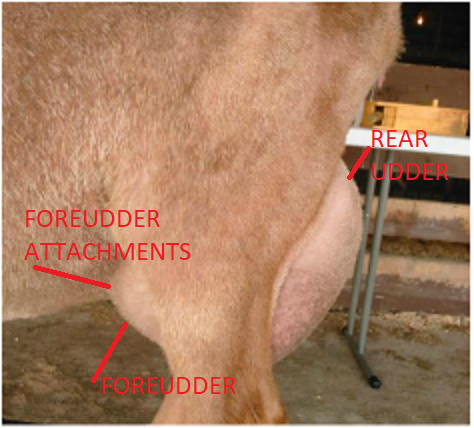
There are many attachments which hold the udder to the body of the goat and provide structure to the udder. The main areas of attachments are the rear udder attachments, the foreudder attachments, lateral attachments (attachments which hold the udder to the inside of the thighs), and the medial suspensory ligament (MSL) which divides the udder halves and holds the udder floor up. The udder halves are not connected and act independently of each other.
Internal Mammary Structure
Internal Mammary Structure
|
The alveoli, which are sack-like microstructures, is the place where milk is produced. Hundreds of alveoli are clustered together to form a lobule. Many lobules make up a lobe. Each lobe, structured like a small cluster of grapes, have a complex duct system that moves the milk from the lobes down to the gland cistern where the bulk of the milk is stored. If the gland cistern is full, there are also minor cisterns near major lobes, where the milk is stored intermediately as it moves toward the gland cistern. Milk is also stored in the duct systems of the udder. The gland cistern is the last stop for the milk, right before it is expressed from the orifice of a teat.
Some additional thoughts: Udders fill from the bottom up, first the gland cistern is filled, and then minor cisterns situated close to lobes will fill. Milk is produced on a supply/demand system. If you want more milk then milk more often. If you want less milk, then milk less often. The goat, if she is being properly fed, will adjust. So you might be asking yourself...why does it even matter if I know how an udder works? Let's learn about milking, and I think you will understand. |
How to Hand Milk a Goat
For this section, I am using much of my original 01/06/2013 blog post from my farm page.
You can see the original post here.
Supplies
A goat in milk
A stanchion w/ feeder
A milk stool
Some grain and/or alfalfa pellets
Paper towels & 10% Bleach water solution in a spray bottle OR Unscented Baby Wipes OR Teat Wipes
1 clean & sanitized milk bucket
Fight-Bac Teat Disinfectant Spray
How to milk:
First, lead the doe to the stanchion. Ours usually come out of the stall willingly and go to the stanchion on their own, and when we have more than one doe milking they will come to the gate to be milked, in the same order, everyday. Feed your doe grain in the stanchion so that she is occupied during milking. This creates a pleasant experience for the doe and is enough to make her want to come to the parlor to be milked the next time.
Cleanliness before, during, and after milking is paramount, especially if you intend to consume the milk, which we do. Clean the teats and udder with baby wipes, or bleach solution and paper towels.
I prefer to milk from behind the doe, but you can easily milk from the side as well. If the doe is used to being milked and is content with letting you milk her while she eats, I find that milking both teats from behind is the easiest and fastest way to get it done. Place the bucket in front of and centered between the doe's back legs, underneath but slightly forward of the teats. Now you are ready to milk.
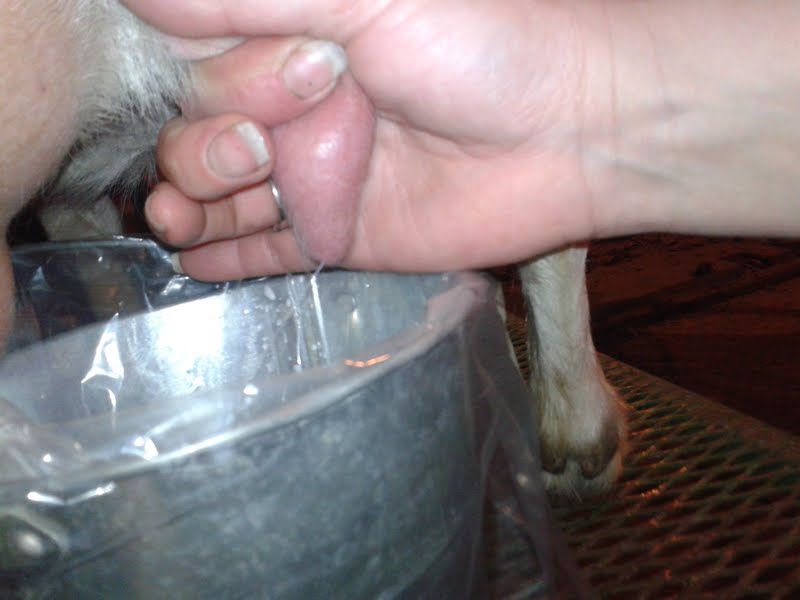
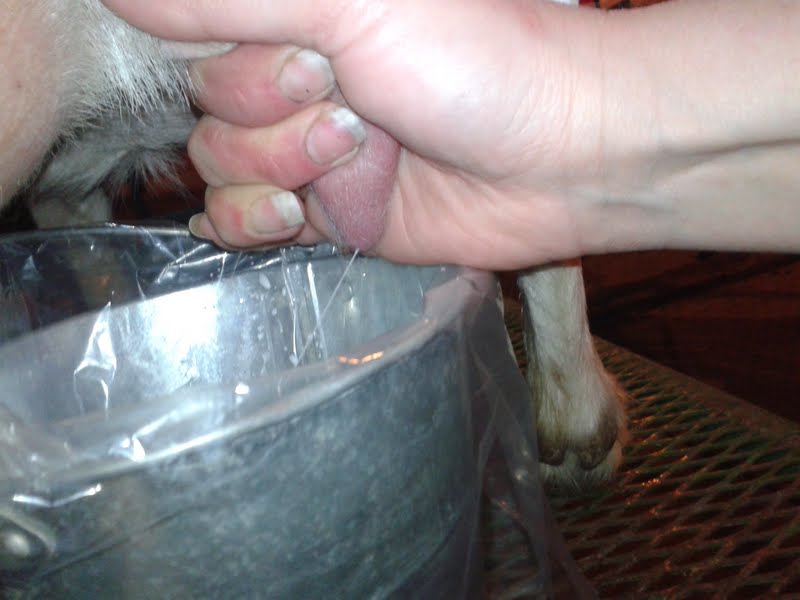
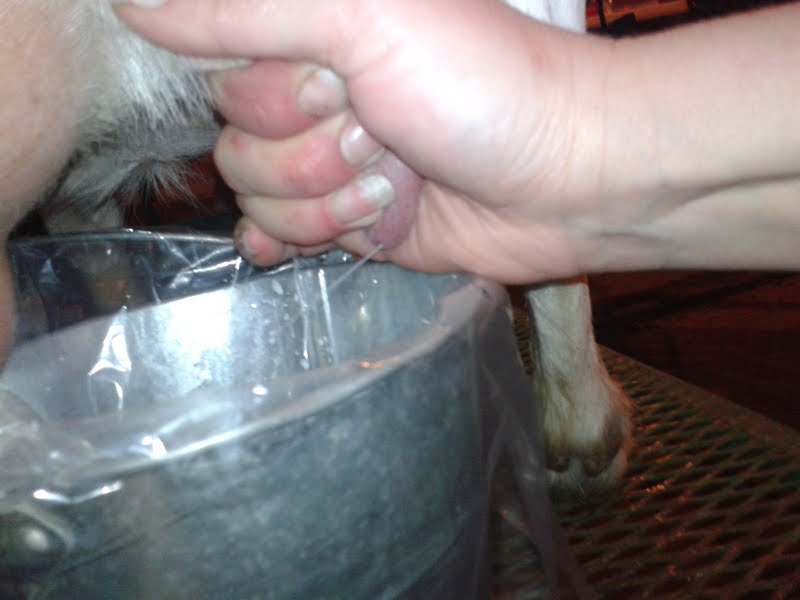
Milk is let down when oxytocin is produced. Bump and massage the udder a couple of times to get the oxytocin flowing to trigger the let down of milk. The trick to milking is to trap the milk at the base of the teat with your fingers and roll it out of the teat with your other fingers. I like to use my thumb and index finger in a circle to trap the milk, and then gently close each of my other fingers in turn to gently extract the milk out of the orifice.
When the teat is empty, I release my thumb and forefinger to let more milk into the teat, trap it again with my thumb and forefinger, and repeat the extraction by closing my other fingers down the length of the teat. Sometimes, I milk both teats simultaneously, while other times I alternate one teat and then the other. Whichever way you decide, it is important to milk both sides evenly to keep the two halves of the udder producing equal amounts of milk. The key to milking is to be gentle, yet firm and always be calm. Milking should be a relaxing experience for the goat as well as for the milker. Never pull or otherwise displace the natural position of the udder or teats. You should be able to gauge whether or not your doe is relaxed. If she tenses (and this is easy to gauge if you are paying attention) she may kick over or step in the bucket, so you need to be quick in the calmest way, and remove the bucket from under her before she moves. This tension or restlessness in the doe usually means that her grain is gone and she wants more. When this happens I remove the bucket and set it in a safe place, refill the grain, and start again. If she does kick over the bucket before you remove it, do not worry. It happens!! Clean it up and start over again. I've spilled lots of milk, and had lots of hooves in the milk bucket!
When you think the doe is near empty, massage the upper part of the udder to trigger those higher lobes and cisterns to let more milk down into the gland cistern. This is called the "hind milk" and many inexperienced breeders miss it. Remember, that milk is supplied according to demand, so if you miss this hind milk, it might not be there tomorrow.
To finish milking, remove the bucket from the stand. Spray each teat with FightBac teat spray or a similar teat dip to seal out bacteria that would enter the teat. Release your doe from the stanchion.
Handling Milk
- Milk should be filtered before you store it, as in...as quickly as possible. Even if you can't see it, there are bound to be little hairs and specks of dust that settled in the milk while you were milking. We use a small piece of butter muslin (fine cheesecloth) and pour the collected milk directly into a Ball jar or milk jug. You can also buy milk filters and milk screens that go over the top of your bucket to filter out impurities as you milk.
- Milk should be cooled as rapidly as possible to preserve flavor and freshness. To cool it quickly, put your bucket into an ice bath and get it down <40° F rapidly.
- Glass jars are best for storing milk. The glass will keep the milk fresher longer. Plastic milk jugs work too, as long as they are cleaned and sterilized before using them. Plastic is porous and therefore can release unwanted flavors into your delicious milk.
- If you choose to pasteurize your milk before using it, you can use an automatic pasteurizer or you can heat your milk in a pot to 161°F for 15 seconds, and then cool it in an ice bath.
- Raw goats milk doesn't really "spoil" it just turns into something else. If you leave your milk in the refrigerator too long, it will likely turn into a sour cream like concoction called clabber, which you can actually use for a ton of things. Pasteurized milk WILL SPOIL.
- Cream does not readily rise to the top of goat's milk, as it is naturally homogenized. If you leave a jar of goat's milk undisturbed for 3-5 days you'll be able to collect a bit of heavy cream off the top.
- Raw goats milk will stay fresh for 10-14 days or longer, depending on how it was handled from the beginning.
Milking Machines
There are dozens of electric and hand actuated milking machines on the market. Most are expensive, require regular maintenance, and require daily cleaning and sanitizing. I cannot recommend any current models, but there are many message boards and groups that you can join to get opinions on all of the options. Even when I am milking 10+ does, I find milking machines to be cumbersome, so I no longer personally use them, although I totally understand why many people do.
What Can I Do With All This Extra Milk?
Now let's venture into the topic of Performance Programs for dairy goats.
There are dozens of electric and hand actuated milking machines on the market. Most are expensive, require regular maintenance, and require daily cleaning and sanitizing. I cannot recommend any current models, but there are many message boards and groups that you can join to get opinions on all of the options. Even when I am milking 10+ does, I find milking machines to be cumbersome, so I no longer personally use them, although I totally understand why many people do.
What Can I Do With All This Extra Milk?
- Make Cheese
- Make Yogurt
- Make Kefir
- Make Ice Cream
- Make Lotion
- Make Soap and MORE!
Now let's venture into the topic of Performance Programs for dairy goats.
Go To Performance Programs or Choose From the Menu Below
